Cabinet Painting Sacramento can be a daunting task, but it doesn’t have to be! It takes proper preparation, but the results are worth it.
First, start by removing your cabinet doors. Place them in a safe area so you can reattach them later. Then, clean them thoroughly with a degreaser spray to ensure that your paint will adhere properly.
The primer used in cabinet painting serves several purposes. It fills in tiny imperfections-like scratches or pores-and helps the paint brush or roller glide smoothly on the surface. This makes the final result look professional and clean. It also allows a higher amount of paint to be applied in fewer coats. This saves time and money, which is always a good thing! Finally, it helps the finish adhere to the surface and prevents peeling and chipping.
There are many different types of primers on the market, each with its own advantages and disadvantages. It is important to choose the right type of primer for your project. For example, an oil-based primer is great for wood cabinets and offers excellent adhesion, but it does create a strong odor and requires more time to dry than a water or latex based primer. A shellac-based primer is an alternative to oil-based primer, and it works well on wood and laminate surfaces. However, it can be expensive and may not hide stains as well as an oil-based primer.
Water-based primers are less expensive and work well on most surfaces, but they may not offer as much adhesion as an oil or shellac-based primer. Finally, there are hybrid primers that combine stain-blocking and adhesion properties at a lower cost than some of the other options.
Before priming, it is essential to thoroughly clean the cabinets. Kitchen surfaces are often covered with grease and grime that can interfere with the bonding of paint and primer. Using a degreaser like trisodium phosphate or a liquid deglosser can help cut through the grease and grime, leaving a clean surface to prime and paint.
It is also a good idea to lightly sand the cabinets before priming. This will roughen up the surface and help the primer and paint adhere to it. It is recommended to use a 220-grit sandpaper to ensure the best results. After sanding, wipe the cabinets down with a damp sponge and allow them to dry completely before applying the primer. It is possible to skip this step, but it will probably result in a less-than-professional finished product.
Paint
When painting cabinets, high-quality products are essential to ensure a smooth finish and durability. Professional-grade cabinet paints tend to cost more upfront, but they are easier to apply and last longer than low-cost alternatives. These paints also contain more resins that resist fading, chipping, and scratching, making them well worth the extra investment. They are available in a variety of sheens, including matte, eggshell, satin, and gloss. While gloss is often preferred for walls, a satin or semi-gloss sheen is best for cabinets since it can withstand more abuse and cleaning.
Before you can begin painting your cabinets, you must thoroughly clean the surfaces. Grease and grime will interfere with proper adhesion, so it is important to use a degreasing agent like Krud Kutter or TSP to remove all dirt, dust, and grease. You should also sand any areas that need it, and patch any holes or imperfections. Then, it is time to apply your cabinet paint!
Cabinets require a special type of paint that is moisture- and stain-resistant. A quality alkyd or oil-based paint is ideal, but there are also a variety of water-based products that offer the same durability with the convenience of water-cleanup and low VOC content (less harmful for indoor spaces). These types of paints should be used in a well-ventilated area to avoid inhalation, and they will take longer to dry than latex.
Once your cabinets are dry, you can install the hardware and re-hang the doors and drawer fronts. Be sure to label where each piece goes before removing it! Every hinge performs a little differently over the years, and returning each item to its original location can help avoid wonky doors and sagging drawers.
It is also a good idea to wait 2-3 weeks for your cabinets to cure completely. Rushing this step is one of the main reasons DIY projects end up with poor results. If you don’t want to wait that long, hiring a pro can be a wise decision, as a poorly painted cabinet job can significantly decrease the value of your home.
Finish
Before painting can start, the surfaces need to be squeaky clean. A good cleaning removes any grease or oil, which will prevent the paint from adhering well. This step is especially important for cabinets located above the stove or near the sink. Use a degreaser, liquid deglosser, or TSP (trisodium phosphate) to thoroughly clean the surface. Sanding is also a good idea to roughen up the surface a bit to make sure your primer and paint will stick.
There are many different finishes available for cabinet painting. Choosing the right one will impact the durability of your cabinets and how easy they are to maintain. For example, satin paint is a popular choice for kitchens because it resists smudges and fingerprints. It is not as durable as glossy or semigloss, however, so it may require more frequent touch-ups.
If you want your cabinets to last as long as possible, a water-based polyurethane is a good option. It dries quickly and is less likely to yellow than oil-based polyurethanes. It is still best to sand and lightly brush before applying, however, as it can leave a milky appearance if applied too thickly.
A stain-blocking primer is an essential part of the prep process for any cabinet painting project. This will help the topcoat of your cabinet paint to hold up to heavy wear and tear, as well as preventing stains from bleeding through the new finish. The best stain-blocking primers are latex or shellac, and they should be used as directed on the label.
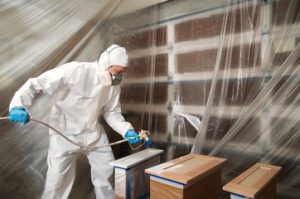
Once the cabinets are ready to be painted, it is important that you cover any areas you don’t want to paint with tape and plastic sheeting. This will ensure a smooth, professional looking finish. If you’re not comfortable handling this part of the project yourself, a professional can do it for you. This will save you time and ensure that your cabinets look their best.
Hardware
Cabinets are a major focal point of a kitchen, and can be a great way to update the look without embarking on a full remodel. Whether you opt for a classic all-white finish, or want to add a bit of flair with brass hardware, freshly painted cabinets will give your space a fresh new look and feel. However, there are a few things to keep in mind before you go head-first into this DIY project.
Cabinet painting requires more prep work than just a standard wall paint job. First, it’s essential to completely clean all surfaces. Using a degreaser is a good way to ensure that any grease or grime is completely removed, so your new paint can adhere properly. Next, it’s important to sand the surface of your cabinetry to remove any bumps or imperfections. Finally, it’s important to mask off any areas that you don’t want to paint, such as counters or appliances. This helps to prevent accidental smudges or splatters that could mar your beautiful new finish.
Choosing the right paint for your cabinets is also crucial. Generally, a high-quality cabinet paint will hold up better to wear and tear than a lower quality paint. This is because cabinet paint is designed to be more durable than wall paint, and can withstand the repeated use that is characteristic of a kitchen.
Once your cabinetry is painted, it’s important to let it cure thoroughly before reattaching any hardware. You should also wait at least 48 hours before resuming normal usage. This will give the paint plenty of time to fully cure to a hard and durable surface that can resist chips and scratches.
Taking on a cabinet painting project can be a daunting task, especially if you’re not sure what to expect. But with a little knowledge and a lot of practice, you can get the professional results you desire and create a kitchen that will stand the test of time. Just be sure to sidestep these common cabinet painting mistakes, and you’ll have a kitchen that looks amazing for years to come.